Newsletter Sign Up
Subscribe to get the latest news and updates. No spam , we promise.


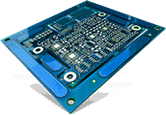
A perfectly operational printed circuit board (PCB) is a result of a meticulous assembly process. The board has to pass through several steps in the manufacturing process. What are they? Read on to know.
There are a number of individual steps involved in a printed circuit board assembly (PCBA). Here are they:
This is the very first step of a PCB assembly. Before you go on adding the components, it is necessary to add the solder paste. It is required to add the paste only to those areas where of the circuit board where you are going to apply solder. Solder paste is applied to the board with the help of a solder screen. The screen has small holes. It is placed on the board at the correct position and a runner is moved across it. This allows the solder paste to squeeze through the holes and get applied on the board.
This is done after the application of solder paste. Surface Mount Technology (SMT) requires precise placement of components, which is hard to achieve through manual placement. Therefore, components are placed on the board with the help of a pick and place machine. The position at which the components are required to be placed and the information of the component required by the pick and place machine is provided in the PCB design information. This simplifies the pick and place programming and makes it more precise.
In this step, the actual connection takes place. After the component placement, the circuit board is placed on the reflow oven conveyor belt. The solder applied during the solder paste process melts during the reflow soldering. This joins the components to the circuit board permanently.
In this step, the printed circuit board is placed on a mechanical conveyor driven system and passed through different zones. The PCB is passed over a molten solder wave, which helps connect the PCB pads/holes, electronic component leads, and the solder. This helps form an electrical connection.
It is very important to clean a PCB after the assembly. This process helps clean all the flux residues with the help of ionized water.
This is one of the most important steps in a PCB assembly. Techniques such as X-ray and AOI are used to determine the quality of the assembled PCB. In this step, the circuit board is checked for any shorts, loose solder balls, and bridges between solder balls.
This is the last step of the entire process. This step involves monitoring whether the product is delivering desired output. The board is tested by several methods and the failures are analyzed.

So, precisely this is how a PCB assembly process works. If you want your PCB assembly to work as desired, always employ the best and experienced resources for the task. Another option to get it done professionally is by outsourcing the PCB assembly. There are many firms that can help you in designing, and build a PCBA that matches your requirements. Creative Hi-Tech is one such company, which has a huge experience in manufacturing PCB assemblies in varied capabilities and specifications